Sanger Metal
Main Page > Products > Hi-Force Hydraulic tools > THE INFORMATION PAGES > TIGHTENING SEQUENCE & BOLTING PROCEDURE FOR FLANGE BOLTS

TIGHTENING SEQUENCE & BOLTING PROCEDURE FOR FLANGE BOLTS

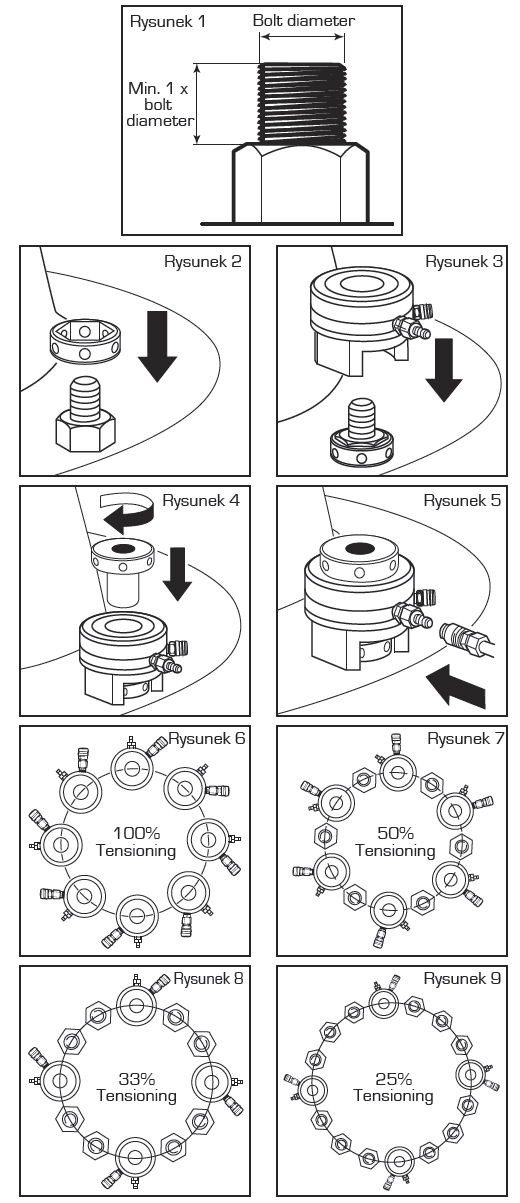
Hi-Force hydraulic stud bolt tensioners offer the quickest, safest and most accurate means of applying a specific residual load to stud bolts. Stud bolt tensioners can be used to easily achieve an accurate and pre-determined bolt loading in a single, simultaneous operation, providing the uniform gasket compression, essential for the integrity of critical bolted connections. Ideally all bolts in the joint should be tensioned simultaneously (100%), however 50%, 33% or even 25% simultaneous tensioning can be carried out, which then requires the operator to make two, three or four tensioning operations by moving around the bolts in diametrically opposed fashion. Whilst partial tensioning will take longer to complete the task, it enables the user to optimise between the cost of the equipment and the available time.


Hi-Force hydraulic stud bolt tensioners are designed to directly stretch the bolt by applying a known load to the fastener using a hydraulic cylinder and threaded puller. The securing nut is then rotated using a short tommy bar, whilst the thread is being stretched, until it is firmly tightened against the joint face. Immediately the hydraulic pressure (load) is released the bolt tension (residual load) is retained, within the clamp length of the stud bolt, because it is prevented from returning to its original length by the tightened nut.
To operate hydraulic stud bolt tensioners, on bolted connections safely, an extra length of threaded stud, above the nut, of at least one x bolt diameter, is required to facilitate easy fitment of the equipment (see figure 1).


Assembly of the tensioners to the stud bolt is quick and easy, provided of course that the stud bolts and nuts are clean, lubricated and in good condition (see figures 2 -5).
Hi-Force has considerable experience in providing precise calculations of the correct bolt load to be applied to ensure an accurate residual load is imparted into the bolts, whether they be tightened using a 100%, 50%, 33% or 25% simultaneous tensioning procedure (see figures 6-9).


Please refer to page 100 for further details on the Hi-Force BoltRight software programme.


Note : If 100% tensioning cannot be achieved by attaching all bolt tensioners, to one side of the flange, due to a lack of space, then alternate the tensioners on opposite side.


As explained on page 116, the two most common methods for tightening of bolted flange joints are either by torque using torque wrenches or by direct tension using hydraulic stud bolt tensioners. Regardless of the method selected a pre-bolting inspection is essential if an accurate and leak free joint is to be achieved first time, every time. The inspection must include checking for any damage to the gasket and sealing surfaces, ensuring that the stud bolts and nuts are the correct size and material, are not damaged in any way and that the correct lubricant is to be used. Additionally it is vitally important that the two flanges are correctly aligned to each other and that the stud bolts can be easily fitted through the bolt holes. If any of the above checks are not satisfactory immediate remedial action must take place before starting to bolt up the joint.


Tightening using torque wrenches
Insert the stud bolts through both flanges and hand tighten the nuts on both sides ensuring that there is full thread engagement on both nuts of every stud bolt. Square up the joint and ensure that all stud bolts are freely moving through the bolt holes and that the nuts are hand tightened against the outer flange faces. Number all bolts sequentially in a diametrically opposed fashion as shown in the illustrations on the right. Commence tightening of the bolts sequentially starting with a first pass at 25% of the final specified and required torque figure, a second pass at 50% and then a third pass at 100%. Finally a check pass should be carried out in either a clockwise or anti-clockwise direction at 100% of the required torque to ensure all bolts are uniformly tightened.


Tensioning procedure using hydraulic stud bolt tensioners
Insert the stud bolts through both flanges and hand tighten the nuts on both sides ensuring that there is full thread engagement on both sides. Take care to ensure that on the selected flange face, to which the tensioners are to be affixed, that there is at least 1 x diameter of the stud bolt thread protruding above the nut face. This is required for the tensioner puller to attach to and if insufficient thread is exposed then the tensioning procedure must not proceed. The exact number and positioning of the hydraulic stud bolt tensioners must then be ascertained i.e. 25%, 33%, 50% or 100% simultaneous tensioning of all the bolts in the respective joint. After deciding the number of stud bolt tensioners to be used simultaneously, affix them to the exposed thread end of the stud bolts, equally spaced around the flange for 25%, 33% or 50% simultaneous tensioning, or on every stud bolt in the case of 100% simultaneous tensioning. Please refer to the comprehensive Hi-Force operating manual for stud bolt tensioners for more detailed instructions. After correctly assembling all of the stud bolt tensioners, on to the flange, hook up the interconnecting hydraulic hoses and the mainline hose to the air driven pump unit and apply the applicable hydraulic pressure, as specified by either the joint equipment manufacturer or the BoltRight software (see page 100). In cases other than 100% simultaneous tensioning there will be two different hydraulic pump pressures to be applied to the bolt tensioners and these should be strictly adhered to. Once all of the stud bolts have been tensioned using the Hi-Force stud bolt tensioners the joint is ready for testing. Take note that it is normal to have to make 2 or 3 passes around the stud bolts when tensioning at 50% or less and usually the lower the number of tensioners being used simultaneously, the more passes will need to be done and hence it will take more time to complete the joint tightening.


Whether tightening the bolts using a torque wrench or stud bolt tensioners it is a good idea to carry out a final check for tightness of all the bolts by simply tapping each nut with a hammer and listen to see if a high pitched ringing sound is achieved. A dull sound indicates that the respective bolt is still loose.


Drukuj
Projekt i realizacja, hosting: Stopklatka.pl
www.sangermetal.com